Removing grease from clothing

The stains might be a little hard to see, but they are there.
This weeks DIY is more of a Susie homemaker kind of project, but its a great life hake that everyone should know about.

I recently bought a new shirt and then stupidly cooked some chicken nuggets on the stove while wearing it. The grease from the frying pan splattered all over my front and I was so pissed at myself I threw the shirt on the floor. Of course it accidentally got washed and I was even more upset with myself for setting the stain before I was able to try and treat it.

After many hours of remorse and a little bit of time on Pinterest, I found this little gem that removes set in grease stains. Check it out.

What you will need:
Baking soda
A flat surface


Step one,
Place your piece of clothing on a flat surface and sprinkle a good amount of baking soda on the affected area. I left the powder on there over night because I wasn't sure how long it would take to work.
Step two,
The baking soda should start to ball up from sucking the grease out of your garment. :)

Step three,
Dust off the powder. I dumped it in the sink. There were little white spots where the grease stains were. I'm not sure if this was normal, but the powder rubbed off when I touched it with my fingers.
Step four,
I put my shirt in the wash and hung it to dry. I wouldn't suggest putting it in the dryer until you are sure the stains are gone. Don't want to double bake them.
After the shirt dried I couldn't find the grease stains. I'm pretty sure they are gone and I am super happy that I get to wear my brand new shirt again.

If you've tried this experiment and its worked or hasn't worked for you, I would love to hear from you. Or if you know of another great way to remove set in grease stains from clothing send me an email at shendersonphoto(@)gmail.com 

Menu: Week 99


Monday
- Baked Penne Rigate

Tuesday
- Beef stroganoff

Wednesday
- Spaghetti

Thursday
- Chicken fajitas

Friday
- Stuffed french toast

Saturday
- Stuffed sweet potatoes

Sunday
- BBQ


Outdoors this week

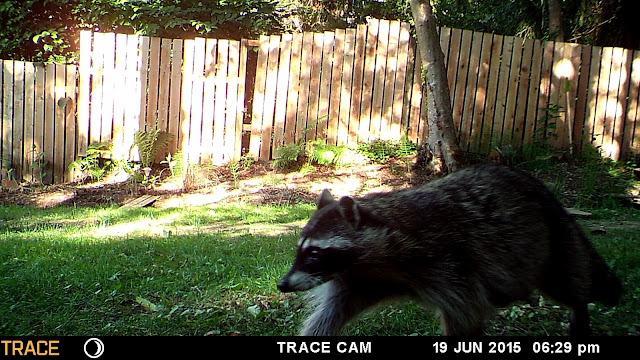
Got some more really awesome trap cam photos this week. There are some really cute ones of a mama raccoon and her babies.


Menu: Week 98

Summer is in fill swing in the Henderson household. My eldest started his swim lessons this week. He was a little apprehensive, but he made it through.

I can't wait to see what he does in the next class.

Enjoy this weeks menu.

Monday
- Cajun chicken Caesar salad

Tuesday
- BBQ

Wednesday
- Grilled cheese

Thursday
- Dinner out and shopping

Friday
- Baked ravioli w/ ground beef

Saturday
- Beef stroganoff

Sunday
- Baked penne rigate

DIY towel rack


I've got another really awesome DIY project for you from the house of Henderson. This one took us the afternoon, although it probably would have taken us more time if it hadn't of been so hot outside. Check it out.
We turned a every day back yard stick into an awesome towel rack and the total price was just over $12. 

What we bought:
2 railing brackets
Some really cheap foam brushes

What we already had:
Sand paper (various)
Polyurethane

Tools we used:
Elbow grease 
A drill and bit
Sharp knife.

Instructions:

Pick a nice kinda straight stick and cut it to the right length. I used a sharp knife to peal all the bark off the sticks then sanded them down several times till they were nice and smooth. This took the most time.

Then my husband painted 3 coats of Polyurethane on the sticks. They are supposed to dry for a few hours before applying another coat but it's been super hot out and they dried really fast.

After that, the husband drilled some holes for the brackets and hung them on the wall. It looks awesome. So awesome we made two. :)


City living... or not.

You asked for more and here it is. The rest of the photos from our back yard trap cam. Check it out.


Menu: Week 97

My husband set up a trap cam in our back yard to see what kind of wild life came through our backyard when we weren't around. It was surprising what we saw. There were a multitude of cats in various colors and shapes. A opossum. A whole family of raccoons and this beautiful coyote that sniffed around for a while. On top of all the animals that ventured through the yard, there were numerous photos of my kids playing in front of the camera. I guess its a good way to keep my eyes on them.

Here is this weeks menu. There is a lot of stuff from last week since our shopping trip got all messed up and I wasn't able to go when I needed to. Enjoy!
  
Monday
- Hamburger hash brown casserole

Tuesday
- Blue cheese burgers

Wednesday
- Chicken tortellini skillet

Thursday
- French toast

Friday
- Spaghetti

Saturday
- Cajun chicken Caesar salad

Sunday
- Fathers day BBQ

Random home projects

We've been in our new home now for almost four months. There was a lot of things we did to make it feel a little more like ours. A little more like we've been here for ever.

Somethings were small. Like the cup hangers we made from old cabinet knobs we removed from the bathroom.

Other things like the pot and pan hanger we brought over from the old house. It cost us less than ten dollar with pieces of random stuff from IKEA.

I can't wait to see what else this little house can hold, but I am ready for the journey.


Menu:Week 96

This week, my eldest son helped me with the menu, so its a little simple but it looks oh so yummy. Enjoy!

Monday
- Chicken Alfredo

Tuesday
- Chicken Tacos

Wednesday
- Eating out

Thursday
- Tortellini and chicken skillet

Friday
- Hamburger hash brow casserole

Saturday
- Nachos

Sunday
- Blue cheese burgers


As always, if you have any recipes you would like me to try, I would be happy to. Just send me an email at Shendersonphoto(@)gmail.com and you might see your recipe on my blog.

DIY solar light - porch piece


When I find a great idea I want to try out, of course I recruit my husband to do all the hard work. Found an idea like this on Pinterest, but it was boring and plane. With about $15 dollars of materials from the Home Depot and a little hard work, my husband and I put this really awesome solar light together for our front porch.

What we used:

  • Wood from a downed tree in our back yard
  • Twine 
  • 3 Solar lights
  • Twigs
  • Wood glue
Other things you will need:
  • A drill and bit to make the holes for the lights


Do you have any DIY crafts like this one? Send me a photo at Shendersonphoto(@)gmail.com and I'll share it with my readers.